

If you've read our piece on using an AI business coach, you already know what's possible. This is the practical follow-on: how to actually set Claude Cowork up so it functions as a proper business coach across the areas that matter most, sales, marketing, finances, staff, and the daily admin that otherwise eats your week.
This isn't an overview of what Cowork can do. It's a step-by-step walkthrough, with copy-paste prompts you can use from day one.
TL;DR
Claude Cowork is Anthropic's AI agent that works directly in your files rather than just chatting. As of July 2026, it runs on desktop (Mac and Windows), web at claude.ai, and mobile (iOS and Android). Sessions run remotely in beta, so work continues even when your laptop is closed. You need a paid Claude plan (Pro or higher) and about 20 minutes for the initial setup. The steps below take you from a blank computer to a fully structured AI business coach with projects, memory, and scheduled weekly reporting.
A note before you start: Cowork's interface is being updated frequently, and Anthropic is rolling out changes fast. As of July 2026, there's one important quirk worth knowing upfront: a project can only be linked to a folder on your computer at the moment you create it, using the Add folder button in the project creation dialog. There's currently no reliable way to add that link afterwards. Steps 2 and 3 below are written around this, so following them in order will save you from having to redo any setup. The screenshots and menu names in this article are accurate as of July 2026, but a button or menu label may have shifted slightly by the time you read this.
Step 1: Check you have what you need
Cowork is part of Claude, not a separate app you sign up for. You access it through your existing Claude account at claude.ai, through the Claude Desktop app, or through the Claude mobile app on iOS or Android.
You'll need a paid Claude plan. Pro is the entry point and handles everything in this tutorial comfortably. Max gives you more capacity for longer or heavier sessions and gets new features rolled out first. Web and mobile Cowork access went to Max subscribers first in July 2026 before expanding to Pro and above.
If you want to use Cowork with local files on your computer, you'll need the Claude Desktop app. Download it from claude.com/download. It runs on Mac and Windows. If you only plan to use Cowork on the web or mobile for now, you don't need the desktop app, but local file access (which most of this tutorial uses) requires it.
Make sure you're running the latest version of the app before you start. Cowork features update regularly and older versions may be missing steps described below.
Step 2: Create your workspace folders
Before you open Claude, set up your folder structure on your computer. You'll create one parent folder plus five subfolders, one for each coaching area. This only takes a couple of minutes and it's all done in Finder or File Explorer, no need to open Claude yet.
On a Mac, open Finder, go to your Documents folder, and create a new folder called AI Coach. To create a new folder in Finder, right-click inside the Documents folder and select New Folder, then name it AI Coach.
On Windows, open File Explorer, go to your Documents folder (or your OneDrive folder if you use OneDrive), right-click inside it, select New > Folder, and name it AI Coach.
Now open the AI Coach folder and create five subfolders inside it, using the same right-click > New Folder method:
- Admin
- Finance
- Marketing
- Sales
- Staff
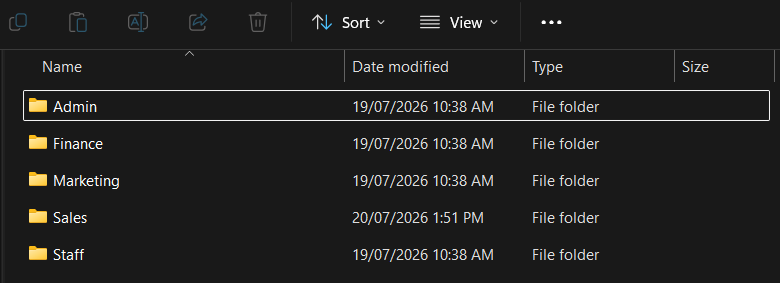
That's it for this step. You should now have an AI Coach folder containing five empty subfolders.
Step 3: Set up your projects (and link each folder while you do)
Before you start any Cowork sessions, set up your five projects. Projects give Cowork memory between sessions, so it isn't starting from scratch every time you open it. Each project also has its own instructions, files, and memory that stay separate from your other projects, so your finance work doesn't bleed into your staff notes.
This step matters more than it looks. Linking a project to a folder on your computer can currently only be done at the moment you create the project (as of the date of this article being published). If you skip it now, there's no reliable way to add that folder later, and you'd need to delete the project and start again. So read this step through before you start creating anything.
Open Claude at claude.ai in your browser, or open the Claude Desktop app. In the left navigation panel, click Projects. On the Projects page, click the New project button in the top right corner. A dialog titled Create a project will appear.
Click Change next to Local folder, then browse to the matching subfolder inside your AI Coach folder. For your first project, that's AI Coach > Sales. Select it.
Type the project name into the Name field. Use Sales Coach. Below that is an Instructions field, this is the same standing-instructions feature covered in Step 4, and you're welcome to fill it in now rather than coming back to it later. There's also an Add files section if you want to attach reference documents at this point, though that's optional and not something you need for this tutorial. Click Create project.
Repeat this process for the other four projects, linking each one to its matching subfolder as you create it:
Marketing Coach, linked to AI Coach > Marketing
Finance Coach, linked to AI Coach > Finance
Staff Coach, linked to AI Coach > Staff
Admin Coach, linked to AI Coach > Admin
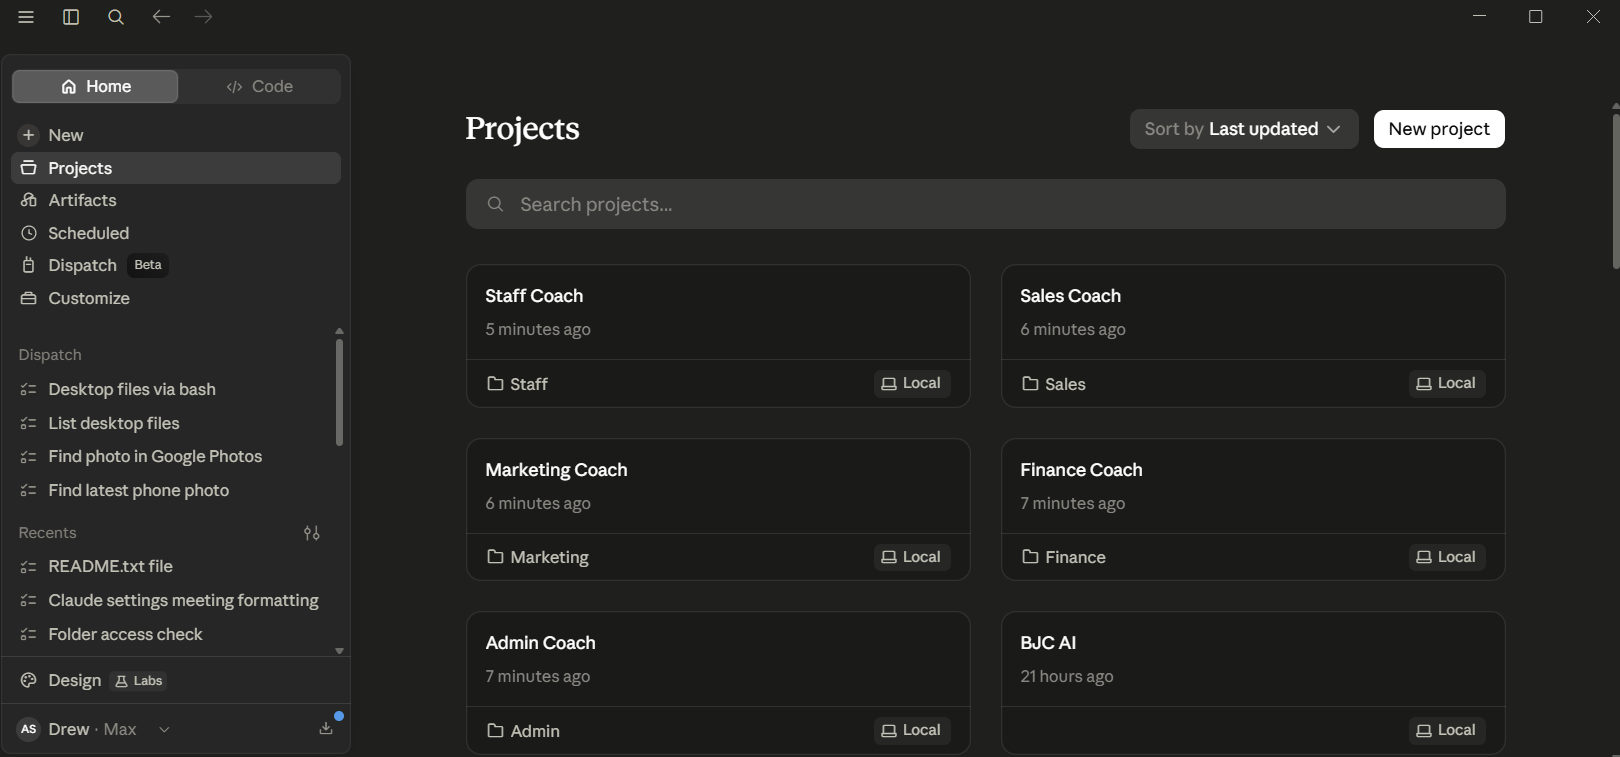
Once a folder is linked at creation like this, it stays linked permanently. Every future conversation you start inside that project will already have that folder attached, with no reattaching needed. Memory in Cowork also works within projects only, so what Claude learns in one project stays in that project and doesn't carry over to others, which is exactly what you want here.
If you've already created one or more of these five projects without adding a folder, the fix is straightforward if unglamorous: delete that project and recreate it properly using the steps above. It only takes a minute, and it's much easier to sort out now than after you've started adding real data.
Step 4: Add your business context to each project
This is the step most people skip, and it's the one that makes the biggest difference to the quality of everything Cowork produces. Instead of re-explaining your business at the start of every session, you write it once inside each project and Cowork carries it through automatically.
If you already filled in the Instructions field while creating your projects in Step 3, you can use this step to review and refine what you wrote. If you left it blank, do it now. Open your Sales Coach project. On the right-hand side of the project page, you'll see three sections: Instructions, Memory, and Context. Click the + next to Instructions (or the pencil icon if you've already added something). Write your instructions in plain English in the box that appears. No special format required, just clear sentences. Repeat this for each of the five projects, adjusting the focus section for each one.
Here's what good project instructions actually look like, using a fictitious example so you can see the level of detail that works:
I run a business called Coastal Trade Supplies. We sell trade hardware and safety equipment to small and medium construction businesses in Queensland, mostly online with a small showroom in Brisbane. Our average order value is around $380 and most customers buy monthly.
There are three of us: I handle sales and operations, one person manages customer service and purchasing, and one handles the warehouse and dispatch.
Right now our biggest priorities are reducing the number of backorders we have each month and growing our repeat order rate. The thing keeping me up at night is that we have a handful of large accounts that make up too much of our revenue. If one of them left, it would hurt.
When you produce anything for me, keep it plain and direct. No padding, no corporate language, no bullet points unless I've asked for a list. I want the short version first, with detail available if I ask for it.
This project is focused on sales and revenue. Every task in here relates to leads, conversions, customer value, and revenue growth. When you're analysing data or making suggestions, always bring it back to what will move those numbers.
That example covers five things that every good set of project instructions needs:
What the business does and who it sells to. Not just "we sell hardware" but who buys it, how often, and roughly what they spend. Cowork uses this to make its analysis and suggestions relevant rather than generic.
Who's in the team and what they handle. When Cowork drafts action items or assigns tasks, it needs to know who does what. Even a one-person business should note that: "it's just me, I handle everything."
Current priorities and what's worrying you. This is what shifts Cowork from a general assistant to something that feels like it actually knows your situation. Update this every few months as things change.
How you like outputs written. Tone, length, format preferences. If you don't set this, Cowork will default to a style that may not suit you. Be specific: "no bullet points", "give me the short version first", "write like you're talking to a tradesperson, not an MBA."
The focus of this project. A clear statement of what this project is for. It keeps Cowork on topic when tasks get complex.
Write your own version of the above for each of your five projects. It doesn't need to be long. Four or five short paragraphs is enough. The more specific you are, the more useful Cowork becomes.
You can also set global instructions that apply across every Cowork session regardless of which project you're in. To do that, go to Settings in the left sidebar, select Cowork, and click Edit next to Global instructions. Put the things that never change here: your name, your industry, your tone preference. Keep the project instructions focused on what's specific to each coaching area.
Step 5: Confirm the link works, and a few things to know before you start
With your five projects created and linked in Step 3, it's worth running one quick test before diving into real work, just to see it in action and build confidence that everything's connected properly.
Open Claude and click Projects in the left sidebar, then click the Sales Coach tile. In the message box, click Cowork to switch into agent mode, then paste in this prompt:
"Create a file called README.txt in this folder that briefly explains what this folder is for, in one or two sentences."
Once you send this, Cowork starts working and a running log appears under your message, showing each step as it happens (reading the folder, writing the file, and so on). That's what this tutorial refers to as the progress indicators. Watch them as the task runs. When it's done, open your AI Coach > Sales folder on your computer and you should find the README.txt sitting there. That confirms the link is working, and it'll work the same way every time you open this project from here on, with no reattaching required.
If you'd like, repeat this quick test in each of your other four projects (Marketing Coach, Finance Coach, Staff Coach, Admin Coach) so you know they're all properly connected before you move on.
A couple of things worth knowing before you start loading real data in. First, de-identify anything you add to these folders. Remove names, contact details, and anything that identifies a specific person, and replace them with generic labels like Customer 1 or Staff Member A. Cowork doesn't need to know who your customers are to spot patterns in their behaviour, it only needs the data itself. For more detail on this, see the sensitive data FAQ in our main AI business coach article.
Second, local file access requires the Claude Desktop app to be open on your computer. If the app is closed, Cowork can keep running a remote session but won't be able to reach files on your hard drive.
Step 6: Sales and revenue coaching
Click Projects in the left sidebar, then click the Sales Coach tile. Switch to Cowork mode in the message box. The folder and project instructions from Steps 3 and 4 are already connected, so you don't need to re-explain your business or reattach anything.
Monthly sales analysis
Export your sales data from whatever system you use (your POS, CRM, accounting tool, or a manual spreadsheet all work). De-identify it by removing customer names and replacing them with labels, then save the file into your AI Coach > Sales folder. Then paste this prompt into Cowork:
"Read the sales data in this folder. Summarise what happened last month: total revenue, best and worst performing products or services, any patterns in timing or customer type, and anything that looks unusual. Then tell me the two or three things I should focus on next month based on what you've found. Keep it plain, no fluff."
Follow-up emails for slow leads
Export your enquiry log or lead list, de-identify it, and save it into the Sales folder. Then:
"Here's my enquiry log from the last 60 days. Find any leads that haven't converted and haven't had a follow-up in more than two weeks. Draft a short, friendly follow-up email for each one that references what they originally enquired about. Save the drafts as individual text files named by the customer label."
Simple revenue forecast
Save three months of revenue figures as a spreadsheet or text file into the Sales folder. Then:
"Using the last three months of revenue data in this folder, build a simple forecast for the next three months. Show me what you're assuming and why. Flag anything that could make the forecast wrong. Export it as a spreadsheet."
Step 7: Marketing coaching
Click Projects in the left sidebar, then click the Marketing Coach tile. Switch to Cowork mode in the message box.
Campaign performance review
Export your results from your ad platform (Google Ads, Meta, or wherever you advertise) or your social media analytics tool as a CSV. Save it into the Marketing folder. Then:
"Read the marketing performance data in this folder. Tell me what's working and what isn't, in plain terms. Which channels or campaigns brought in the best results relative to what was spent? Which ones should I either fix or stop? Give me your honest read, not a list of everything that happened."
Content calendar
Create a simple text file in the Marketing folder with notes about your upcoming products, promotions, or anything seasonal. Then:
"Based on the project instructions and the notes I've added to this folder, build a content calendar for the next four weeks. Include post topics for [add the platforms you use, for example: Instagram, Facebook, LinkedIn], suggested publish days, and a one-line brief for each post. Save it as a spreadsheet with columns for date, platform, topic, and brief."
Campaign copy
Save a brief into the Marketing folder describing what you're promoting, who you're targeting, and what you want people to do. Then:
"Read the campaign brief in this folder. Write three versions of the ad copy (short, medium, and long), a matching email subject line and body, and two social posts. Tone should match the project instructions. Save each version as a separate file."
Step 8: Finance and cash flow coaching
Click Projects in the left sidebar, then click the Finance Coach tile. Switch to Cowork mode in the message box. This is the area where de-identification matters most. Before dropping anything in, remove supplier names, individual customer identifiers, and account numbers. Replace them with labels like Supplier A, Customer 1, or Account ending 4521. Cowork produces the same quality output either way.
Monthly financial summary
Export your revenue and expense data from your accounting tool (Xero, MYOB, QuickBooks, or a manual spreadsheet all work). De-identify it and save it into the Finance folder. Then:
"Read the financial data in this folder for last month. Write me a plain-English summary: what came in, what went out, what the net position was, and whether anything looks out of the ordinary. Flag anything I should be aware of or investigate. Keep it to one page."
Invoice and cash flow tracking
Export your invoice list from your accounting tool, de-identify it, and save it into the Finance folder. Then:
"Read the invoice data in this folder. Identify any invoices that are overdue or coming up on their due date in the next seven days. Calculate the average number of days my customers take to pay. Draft a short, professional follow-up message for each overdue invoice, addressed generically. Save the drafts as individual text files."
Pricing or margin modelling
Save a note into the Finance folder with your current pricing, your rough cost to deliver each product or service, and what you're considering changing. Then:
"Based on the pricing and cost information in this folder, model what happens to my gross margin if I increase prices by 10%, 15%, and 20%. Also show me what happens if I add a new service at [price] with [estimated cost to deliver]. Present the scenarios in a simple comparison table and export as a spreadsheet."
Step 9: Staff management and training
Click Projects in the left sidebar, then click the Staff Coach tile. Switch to Cowork mode in the message box. Keep this folder strictly de-identified: job titles and role labels rather than names.
Check-in and performance summaries
After your one-on-ones or team check-ins, type up your rough notes and save them as a text file in the Staff folder. Even bullet points are fine. Then:
"Read the check-in notes in this folder. Summarise the key themes coming up across the team. Flag anything that appears in more than one person's notes. For any issues raised, suggest a possible action or follow-up. Then draft an agenda for next month's check-ins based on what came up this time."
Onboarding guides
Save your rough notes about how a role works into the Staff folder, along with any existing process docs, and a short note on what's been hard for previous hires in that role. Then:
"Read the role notes and process documents in this folder. Write a structured onboarding guide for a new [job title]. It should cover: what the role does day to day, the key processes they need to know in their first two weeks, who they work with and how, and common mistakes to avoid. Format it clearly so someone can follow it on their first day."
Training materials from existing SOPs
Once you have an SOP (either one you already have or one produced in Step 10), save it into the Staff folder. Then:
"Read the SOP in this folder. Convert it into two things: a step-by-step training checklist a new team member can tick off as they learn, and a short quiz of five to eight questions to check their understanding once they've finished. Save them as separate files."
Job ads and hiring
Save a note into the Staff folder describing the role you're hiring for, what the rest of the team looks like, and honestly, what hasn't worked in previous hires for this kind of role. Then:
"Based on the hiring brief in this folder, write: a job ad for [platform, for example Seek or LinkedIn] that attracts the right kind of applicant without sounding corporate, a shortlist criteria document with the five things I'd use to screen applications, and ten interview questions that would actually help me work out if someone's the right fit. Tone should match the project instructions."
Step 10: Admin and operations coaching
Click Projects in the left sidebar, then click the Admin Coach tile. Switch to Cowork mode in the message box.
Meeting notes into action items
After any meeting, type up or paste in your rough notes and save them as a text file in the Admin folder. Voice memo transcriptions work well here too if your phone transcribes automatically. Then:
"Read the meeting notes in this folder. Pull out every action item, who it's assigned to (use role labels, not names), and any stated deadline. Format them as a clean action list. Flag anything that was discussed but didn't get a clear owner or deadline."
Writing SOPs from rough notes
Save a rough description of how a process works into the Admin folder. It doesn't need to be tidy. Even a stream-of-consciousness explanation of the steps is enough. Then:
"Read the process notes in this folder. Write a clear, step-by-step SOP for [process name] that someone unfamiliar with the business could follow. Include what to do if something goes wrong at each step. Keep the language plain."
Organising documents and receipts
This task works well from your linked Admin folder. Once you're in Cowork mode inside the Admin Coach project, paste this prompt:
"Scan everything in this folder. Create subfolders for: Contracts, Invoices, Receipts, Reports, and Other. Move each file into the right subfolder. Rename any files with generic names like 'Document 1' or 'Scan 23 May' to something descriptive based on the file contents. Give me a summary of what you moved and renamed when you're done."
Step 11: Schedule Cowork to run automatically
Here's where it stops being a tool you use and starts being a system that runs for you.
As of July 2026, scheduled tasks run on Anthropic's servers, which means they run whether your laptop is open or not. You don't need to be at your desk. You don't need the app open. The exception is tasks that need local files or apps. Those will only run when the Claude Desktop app is open on your computer.
To set up a scheduled task, click Scheduled in the left sidebar. This takes you to the Scheduled tasks page. Click New task in the upper right corner. You'll have two options:
- Create with Claude. Type what you want the task to do and Claude will ask you a few questions (cadence, timing, specifics) before setting it up. This is the easier starting point.
- Set up manually. Lets you specify the task name, schedule, and prompt yourself if you prefer more control.
Once created, the task appears on your Scheduled tasks page where you can view, edit, pause, or delete it at any time.
Three recurring tasks worth setting up straight away:
- Weekly sales summary (every Monday morning)
"Read the sales data added to the AI Coach > Sales folder since last Monday. Summarise what came in, flag anything unusual, and give me a one-paragraph read on where the week is starting from. Save the summary as a file named with this week's date." - Monthly financial snapshot (first of each month)
"Read the financial data in the AI Coach > Finance folder for last month. Produce a one-page summary: revenue, expenses, net position, any anomalies. Save it as Monthly-Summary-[Month-Year].txt." - Monday priorities list (every Monday)
"Check the AI Coach > Admin folder for any meeting notes, action lists, or open items added in the last seven days. Pull together a prioritised list of what needs attention this week, with a one-line reason for each item. Save it as This-Week-[date].txt."
Once these are running, you'll start each week with your numbers summarised, your priorities listed, and your outstanding actions already pulled together.
Step 12: A few things to keep in mind
Cowork has real file access, which is what makes it useful and what makes it worth treating carefully. Before any session where you're asking Cowork to reorganise or rename files, back up the relevant folder first. Use the progress indicators during complex tasks so you can see what it's doing and stop it if something looks off. And start with read-and-summarise tasks before you move to create-and-edit ones, so you get a feel for how it interprets your prompts before anything is changed.
Cowork will ask for your explicit permission before permanently deleting any files. You'll see a permission prompt and need to click Allow before any deletion happens. That said, file reorganisation tasks can still produce results you didn't expect, so a backup is always the safer starting point.
Manually backing up before every session gets old fast, especially once you've got scheduled tasks running unattended overnight. A better long-term fix: if you already use Google Workspace, Microsoft 365, or a similar cloud backup service, put your AI Coach folder inside whichever folder that service automatically backs up or syncs (your Google Drive or OneDrive folder, for example). Most of these keep version history, so if Cowork ever does something you didn't intend, you can roll back individual files or the whole folder without having to think about backups yourself. If you don't have one of these already, even a simple scheduled backup tool that copies the AI Coach folder somewhere else once a day removes the need to remember to do it manually.
On approval modes: when you open Cowork, you can set how much autonomy it has. Manual means it pauses and asks your approval before each action. Auto means it keeps working and checks actions for safety without stopping for every step. Skip means it acts without pausing at all. For everyday business tasks, Auto is a good balance. For anything involving important files or external accounts, switch to Manual so you can review each step.
Remote sessions (web and mobile) are still in beta. They're reliable for most tasks, but for anything file-heavy or complex, the desktop app remains the more stable option for now.
Frequently asked questions
Do I need a paid plan?
Yes. Cowork requires a paid Claude plan. Pro is the entry point and handles everything in this tutorial. Max gives you more capacity, gets new features first, and is where web and mobile Cowork access rolled out first in July 2026.
Does Cowork work on Windows?
Yes. Windows x64 is fully supported. Download the latest version of Claude Desktop from claude.com/download. Cowork requires the latest version on Windows specifically.
Does Cowork work on Mac?
Yes. Claude Desktop runs natively on Mac, and Mac is currently the more polished experience for complex file tasks. Download the latest version from claude.com/download.
Will Anthropic use my files for training?
No. Anthropic doesn't use your Cowork files for training. Always check the current privacy policy at anthropic.com before loading anything sensitive, since terms can change.
Do I need to keep my laptop open while Cowork runs?
For most tasks, no. Sessions run remotely in beta, so work continues even when your device is closed. Scheduled tasks also run server-side. The exception is anything that needs local files, your browser, or computer use. Those require the Claude Desktop app to be open on your computer.
What's the difference between Cowork and regular Claude chat?
Chat is a conversation: you ask, it answers. Cowork is an agent: it works in your actual files, creates and edits documents, runs multi-step tasks, and can be scheduled to run on its own. Both live in the same interface now. Switch between them using the selector in the message box.
Can I connect Cowork to other tools like Gmail, Google Drive, or OneDrive?
Yes. Cowork connects to Gmail, Google Drive, Slack, DocuSign, Microsoft 365 (Outlook, OneDrive, SharePoint, Teams), and many others through the plugin and connector system. To set these up, open the Customize menu in the left sidebar and go to the Connectors tab. This is a genuinely different process to the local folder linking covered in this tutorial, with its own capabilities and limits, so we're covering it properly in a follow-up article rather than trying to squeeze it in here.
Can I link a folder to a project after I've already created it?
Not reliably, as of July 2026. Folder linking currently only works through the Add folder button in the project creation dialog, at the moment you set the project up. Once a project exists without a folder, there's no confirmed way to add one later. If you've created a project without linking a folder, the simplest fix is to delete it and recreate it using the steps in this tutorial.
What if Cowork does something I didn't expect?
Stop the task using the progress indicators in the session, check what it's done so far, and restore from your backup if needed. This is why the dedicated folder structure from Step 2 matters. If Cowork only has access to your AI Coach folder, the worst-case scenario stays contained. If you'd pointed it at your entire Documents folder, it wouldn't be.


